A distribution list (or distribution group) is one e-mail address, such as sales@yourcompany.com, that forwards a message to a whole group of people. Handy for departments, project teams or everyone at one location. You can also use it in Teams to invite a group to a meeting or add them to a team in one go. This article shows how to create a distribution list in Microsoft 365, how to use it in Teams and Outlook, and when another kind of group is a better choice.
Distribution list or another group?
| Group type | What you get | Choose it when |
|---|---|---|
| Distribution list | One e-mail address that sends mail to all members | You only want to e-mail a group |
| Microsoft 365 group | E-mail, shared calendar, SharePoint site, Planner and optionally a team in Teams | The group also works on files together |
| Mail-enabled security group | Access to files, apps and sites, plus mail | You want to grant permissions to a group |
| Dynamic distribution list | Members are determined automatically from properties such as department or location | The list must stay up to date by itself |
Create a distribution list in the Microsoft 365 admin center
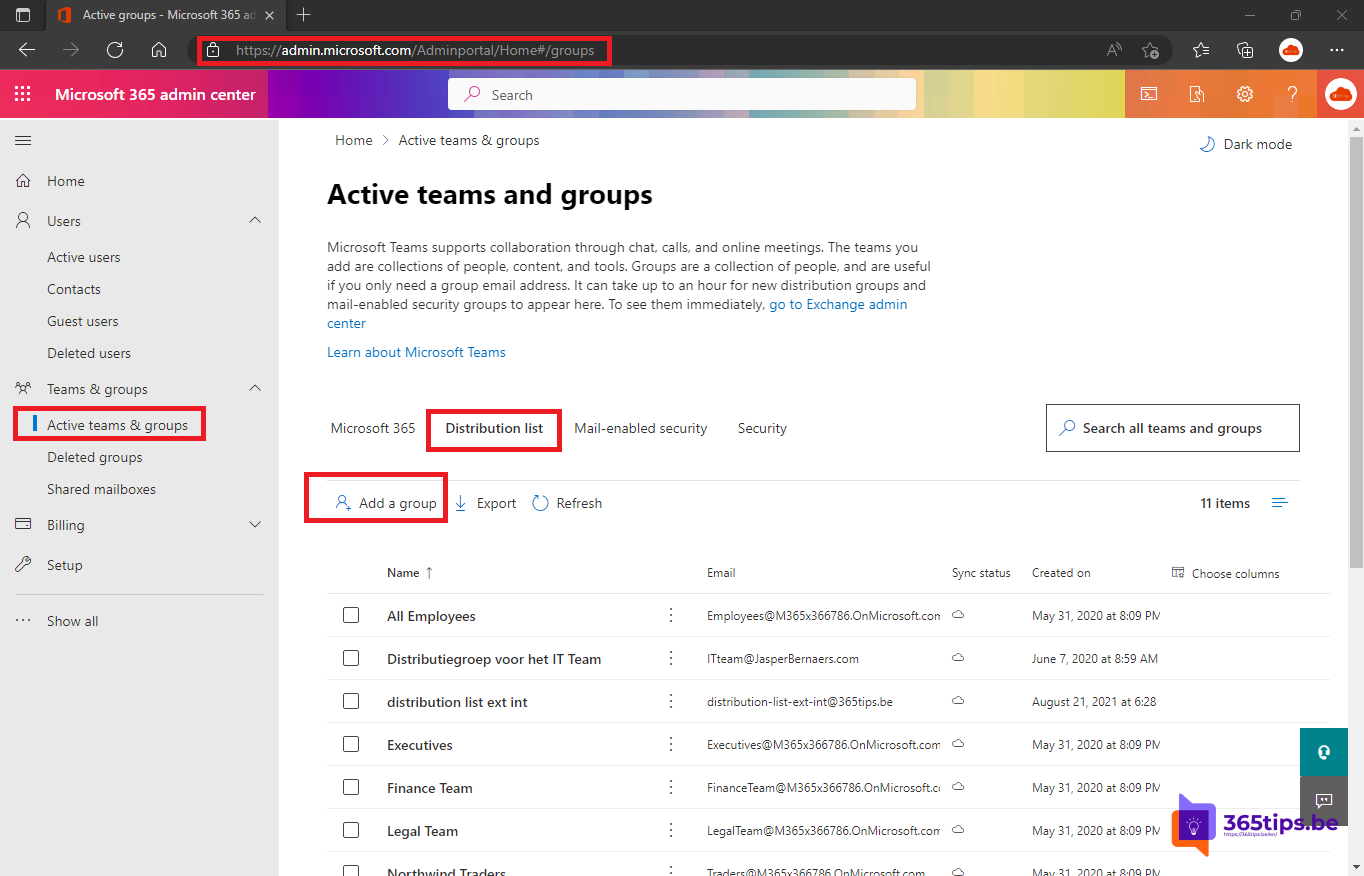
- Go to the Microsoft 365 admin center > Teams & groups > Active teams & groups.
- Open the Distribution list tab and click Add a distribution list.
- Enter a name and description, and click Next.
- Choose one or more owners: they can add or remove members later.
- Add the members.
- Choose the e-mail address and tick Allow people outside of my organization to send email to this distribution list if customers or suppliers need to e-mail it.
- Click Create group.


It can take a few minutes before the list appears in Outlook and Teams.
In the Exchange admin center
In the Exchange admin center go to Recipients > Groups > Distribution list > Add a group. There you get more options, such as who may send to the list, message approval (moderation) and whether members may join or leave themselves.
With PowerShell
Connect-ExchangeOnline
New-DistributionGroup -Name "Sales" -PrimarySmtpAddress "sales@yourcompany.com" `
  -Members "an@yourcompany.com","jan@yourcompany.com" -ManagedBy "an@yourcompany.com"
# Allow external senders:
Set-DistributionGroup -Identity "Sales" -RequireSenderAuthenticationEnabled $false
# Add a member:
Add-DistributionGroupMember -Identity "Sales" -Member "piet@yourcompany.com"
A dynamic list for everyone in one department is created with New-DynamicDistributionGroup.
Using the distribution list in Teams
- Meeting: type the list's name in the Required attendees field. All members get the invitation.
- Adding members to a team: as a team owner choose Add member and type the distribution list's name. Teams adds all current members at once. Note: that is a one-time action. People who join the list later don't automatically become team members.
- Group chat: type the list's name in a new chat to add everyone at once.
In Outlook
Type the list's name or address in the To field. The plus sign in front of the name expands the list so you can see who is in it. Sending something sensitive? Check who is on the list first.
Tips
- Give every list at least two owners, so management doesn't stall when someone leaves.
- Want a group that also shares files? Choose a Microsoft 365 group or create a team in Teams straight away.
- Only allow external senders when needed; otherwise the list becomes a spam target.
Read also
How to set out of office on a shared mailbox in Microsoft 365
How to create a free Microsoft Teams account
All Microsoft 365 admin portals in one list: the right URLs in 2026
Nederlandstalige versie: Een distributielijst maken in Microsoft 365 en gebruiken in Teams